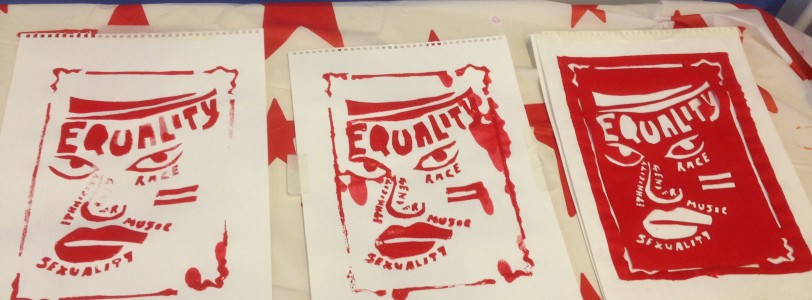
The screen printing technique we used was made famous by many of the pop artists of the 1960s and feeds into the pop culture theme. Our version of this technique was much cheaper than buying the expensive equipment and is a diy version of what happens in an artists studio. Our project ties in with this months Voice theme of gender. Illuminates latest project is about Protest, linking to recent exhibitions at the V and A as well as future exhibitions at Nottingham Castle and as such in previous weeks we had studied many different protest campaigns and the visual culture protest posters that were produced at the time. We were presented with many different protests and campaigns, but one that stuck out to me was the protests about gender, sexuality and equal rights.
Last week, we were asked to design and create our own poster about a protest. I chose to create mine about gender and equality. I wanted to share with you what I have created but also how I have created it. I've included photographs of what I did so hopefully it will make clearer the steps that I took! Hopefully you will be able then be able to create your own screen prints at home, whether based on the pop art of the 1960s or protests about gender and sexuality!
Create your own Screen Print
You will need:
- A large A3 Photo frame with thick frame
- Porous Material to the size of the glass/plastic within the photo frame
- Masking Tape
- Craft Knife/Scissors
- Paints
- A3 Paper
- Some form of free card (Costa card or similar- don't wreck a card you need and do not use a credit/debit card!)
1. Face down, take the glass/plastic front out of your photo frame. Place the material stretched in its place. Secure with masking tape around the edge of the frame. (Don't be scared to use a lot of tape you want to cover up any gaps between frame and material!)
2. On an A3 piece of paper sketch out a few ideas for a stencil or shapes you wish to use. Once decided, copy one design onto a new piece of A3 paper. Remember to check the piece of paper against the frame to deduce where the paint will reach on your paper. Also remember that you can create a stencil where you remove areas you want the paint to cover, OR you can make individual shapes where you don't want the paint to cover.
3. Once happy with your design, cut out the stencil or shapes with a craft knife or scissors. This bit took the most time at our workshop and needed concentration!
4. When you are done, place your design onto a fresh piece of A3 paper. Either lay the stencil over the a3 sheet OR if using shapes, place these strategically on the paper where you don't want the paint to cover.
5. Place the frame you created over the A3 sheet of paper, so the material rests directly on top of the paper.
6. Squirt plenty of paint in a line between the two very top corners of the frame, onto the material. Using an old card, scrape the paint downwards towards the bottom of the frame. This may take several attempts as you move the card along the line and try and get the paint to cover. Feel free to place more paint on the frame but always use a downward motion rather than left to right.
7. Repeat step 6 but this time squirt the paint between the two very bottom corners of the frame, onto the material. Using the card, scrape the paint upwards towards the top of the frame. Always use an upward motion. Keep going until you have covered the entirety of the frame in paint and every gap has been filled.
8. Once this is done, carefully lift the frame off the paper and discard. On the paper will be your finished screen print! Leave it somewhere to dry.
9. You can reuse your stencil and create multiple screen prints. If you prefer you can wash the frame for a more 'perfect' finish second time around, but at the workshops we just reused the frames as they were to produce multiple prints.
NB: As this is a DIY version the results are not perfect but that is the beauty of the screen printing technique. It is rough around the edges but produces multiple prints in Andy-Warhol style. If you wish to up your screen printing game, you can buy ready-made professional screens and squeegees from good art shops rather than creating your own photo frames and using the card. In this How-To we wanted to do screen-printing using everyday materials, which is also a much cheaper option as screens and squeegees can be expensive!
I hope you've enjoyed learning how to Screen Print and have had an insight into what I get up to with Illuminate!


0 Comments